How to Use the Cursor CLI (cursor-agent) From Your Terminal
Learn how to use cursor-agent from your terminal, keep repo context, review diffs, and manage multiple sessions without losing prompts.
What is a terminal-based coding agent, and why run one from your shell?
A terminal-based coding agent is a command-line program that runs inside your shell, scoped to whichever repository directory you launched it from. You give it instructions, it edits files in place, and you review the diff with the same Git tooling you already use. The terminal is the interface — no editor window required.
The reason to run one from the terminal is workflow density. From a shell you can keep the agent next to git status, your test runner, your branch switcher, and any other CLI you depend on. You can also script around it: cd into a worktree, start a session, hand it a scoped task, and move on. For developers who already orchestrate multiple repos from the command line, a terminal-resident agent fits the existing muscle memory far better than an editor-bound one.
A note on scope: agent CLIs ship changes frequently, and the available public research for this guide does not verify current install paths, flags, or auth flows for any specific vendor's CLI. Treat this article as a durable workflow runbook — repo hygiene, prompt structure, multi-session monitoring — and verify version-specific commands against the CLI you actually have installed. <your-agent-cli> --help is always the right first stop.
How do you install or enable a coding-agent CLI on your machine?
Before writing any prompts, confirm three things: the binary exists, it's on your PATH, and you're authenticated. That's the entire setup checklist.
Depending on the tool, the CLI may be bundled with a desktop app, installed from within that app's settings, or installed separately via a package manager or installer script. Check the vendor's official documentation for the install path that matches your current release rather than guessing. Once installed, verify it from a fresh terminal:
- Run
which <agent-cli>(orcommand -v <agent-cli>). A path means it's onPATH; empty output means it isn't. - If the command isn't found, check which shell you're using (
echo $SHELL) and confirm your profile file is being sourced. A common failure is an installer that writes to~/.zshrcwhile you're runningbash, or vice versa. - Open a brand-new terminal window after install — existing sessions won't pick up
PATHchanges. - Run the help flag (
--helpor-h) to confirm the binary actually executes.
For authentication, run the CLI's login command and complete the flow it prompts you through. The important habit: terminal auth state is scoped to the machine and user you're logged in as, so if you ssh into a remote box or switch users, you'll need to authenticate there too. Don't copy credential files between machines — re-auth instead.
How do you run a coding-agent CLI step by step inside a Git repo?
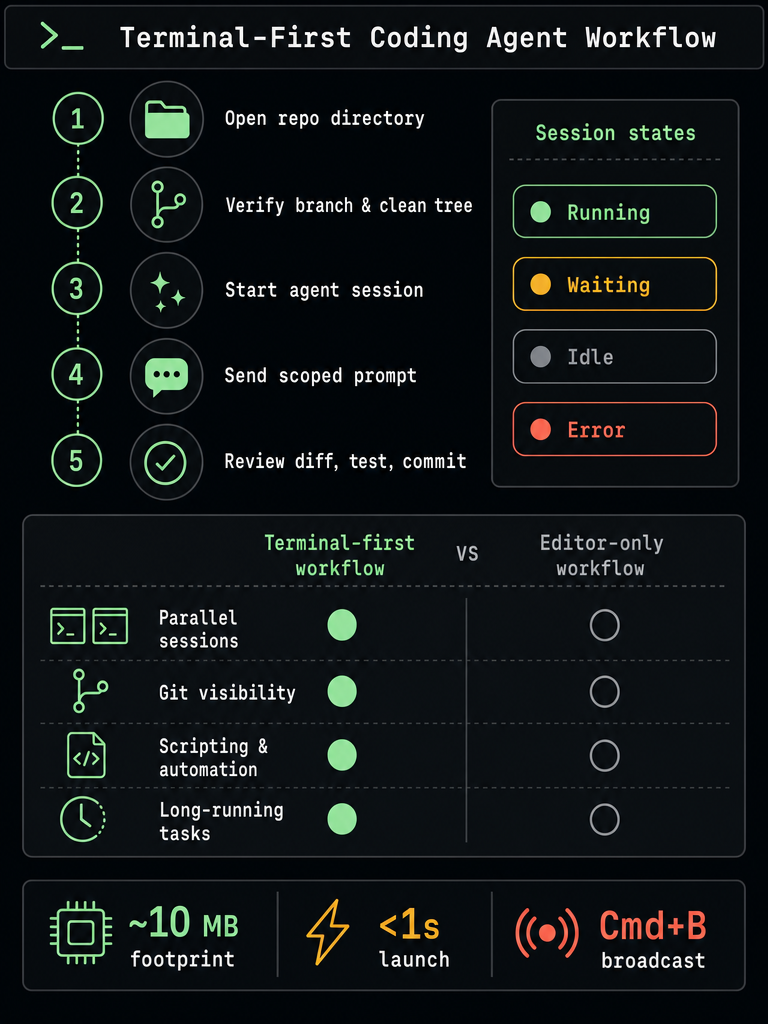
Start small, in a clean branch, with a scoped task. The point of a first run isn't to test the agent's ceiling — it's to confirm the loop works end to end so you trust it on real work.
A safe first run looks like this:
cdinto the repository you want to work in. The agent's working directory is the directory you launched it from.- Run
git statusandgit branch --show-current. Confirm the working tree is clean (or that any uncommitted changes are ones you want the agent to see) and you're on a branch you're willing to mutate. Create a dedicated branch if not:git checkout -b experiment/agent-first-run. - Start the agent from inside that directory.
- Give it a small, bounded instruction. Something like: "Add a unit test for the
parseConfigfunction insrc/config.tscovering the missing-file case. Don't modify the function itself." Concrete file, concrete behavior, explicit constraint. - Watch the session. The agent will either complete the task, ask a clarifying question, or surface an approval prompt before running a command. Don't walk away on the first run — you want to see how it asks.
- When it finishes, drop into a separate terminal pane and run
git diff. Read every line. Then run your test command (npm test,pytest,go test ./..., whatever applies). - If you like the result, commit with a message that flags it as agent-generated:
git commit -m "test(config): cover missing-file case (agent-assisted)". If not,git restore .and try a sharper prompt.
The pattern to internalize: scoped branch, scoped prompt, review the diff before you trust the test. Everything else in this guide is a variation on that loop.
How do you pass prompts, approvals, and repo context without losing control?
A good prompt to a terminal agent reads like a small ticket, not a wish. Vague instructions produce sprawling edits; specific instructions produce reviewable diffs.
Include five things in every non-trivial prompt:
- Target files or modules — name them explicitly (
src/auth/session.ts, not "the auth code"). - Acceptance criteria — what does "done" look like? A passing test, a specific function signature, a removed deprecation.
- The test or verification command —
npm run test:unit -- session, so the agent can verify its own work. - Constraints — "don't touch the database schema", "keep the public API unchanged", "no new dependencies".
- What not to modify — explicit out-of-scope files. This is the single highest-leverage line in any prompt.
On approvals: if your CLI version offers an approval mode for shell commands or file writes, leave it on while you're learning the tool. The friction of confirming each step is the cost of seeing what the agent actually wants to do. Turn it down only for repetitive, well-understood tasks. Verify the exact mode names and defaults in your installed version's --help output — they vary between tools and releases.
On repo context: the agent inherits your shell's working directory, environment variables, and Git state. If your working tree is dirty when you start a session, the agent sees those changes as part of the codebase. That's sometimes what you want (continuing a half-finished feature) and sometimes not (you forgot to stash). Run git status before every session start as a reflex.
Can terminal agents run non-interactively, and which CLI settings should you verify?
Short answer: interactive TTY usage is the default and the safest mode. Non-interactive or scripted use may be supported depending on the tool and version, but it's where most surprises happen, so verify before you automate.
Interactive sessions are safer because the agent can ask clarifying questions, surface approval prompts, and stream output you can interrupt with Ctrl+C. Scripted runs — piping a prompt in, running headless in CI, batching across repos — skip those guardrails. They're useful for repetitive tasks (apply the same refactor across ten services), but only after you've validated the prompt produces the right diff interactively first.
Before relying on any non-interactive mode, verify the following against your actual installed version:
| Setting | What to verify | How |
|---|---|---|
| Help output | Current flags and subcommands | <agent-cli> --help |
| Config file location | Where settings live on disk | Vendor docs; common paths are under ~/.config/ or ~/.<tool>/ |
| Model selection | Whether you can pin a model per session | Help output or config |
| Approval mode | Default behavior for shell commands and file writes | Help output |
| Environment variables | Auth tokens, model overrides, log levels | Help output and docs |
| Working directory behavior | Does it always use cwd, or can you pass a path? | Help output |
Never assume a flag exists because it would be useful — check --help on the version you have installed. CLI surfaces change between releases, and inventing flags from memory is how scripts silently no-op.
How do you run terminal agents across multiple repos, branches, and worktrees?
The moment you go from one agent session to four, isolation becomes the whole game. Each session needs its own directory, its own branch, and its own scoped task — otherwise edits from one project bleed into another, or you commit to the wrong branch at 2 a.m.
The pattern that scales:
- One repo per session, always. Launch the agent from inside the repo's directory, not from a parent folder. The working directory is the boundary.
- One branch per task. Before starting a session,
git checkout -b agent/<short-task-name>. If you're working on multiple parallel tasks in the same repo, use Git worktrees:git worktree add ../myrepo-feature-x feature-xgives you a separate directory on disk for that branch, and you launch a separate agent session from it. - Name your panes or windows after the repo and branch.
myapp / fix-auth-redirectis more useful thanTerminal 3. - Write per-repo prompt context. Keep a
.agent-context.md(or whatever name you like) in each repo with the build command, test command, code style, and "do not touch" list. Paste relevant bits into prompts rather than retyping them. - Review per session, not per session-cluster. Run
git diffand tests in each session before moving on. Don't batch reviews — context fades fast.
A worktree-based layout for an indie hacker running three features in parallel might look like:
| Path | Branch | Session purpose |
|---|---|---|
~/code/myapp | main | Read-only, integration checks |
~/code/myapp-billing | feature/billing-v2 | Stripe webhook refactor |
~/code/myapp-search | feature/search-rerank | Add embedding rerank step |
~/code/myapp-bugfix | hotfix/timezone-bug | Reproduce and patch |
Four directories, four branches, four agent sessions, zero chance of cross-contamination. The cost is keeping track of which session is doing what — which is exactly where the next section comes in.
How do you monitor waiting, errored, idle, and running agent sessions at scale?
Once you're running four or more terminal-backed agent sessions, the bottleneck isn't the agent — it's you noticing when one of them is waiting. Terminal tabs hide PTY state behind a single active pane, so a session can sit blocked on an approval prompt for twenty minutes while you're heads-down in another tab.
This is the specific problem CodeGrid is built for. According to the CodeGrid project description, CodeGrid is a native macOS workspace that puts every terminal session in its own pane on a free-form 2D canvas. You drag, resize, and zoom panes; every pane shows a live status indicator — running, waiting, idle, or error — that stays visible even when you zoom out to see the whole workspace. A waiting agent session in the corner of the canvas is obvious at a glance.
A few features earn their keep in this workflow specifically:
Cmd+Bbroadcast sends one keystroke or command to every selected pane at once. Useful when you want to run the samegit pull,npm install, or scoped prompt across ten repos without retyping. See Broadcast One Prompt to Every Agent for the workflow detail.- Per-project workspaces keep each client or product in its own canvas with its own layout, so switching contexts is one keystroke instead of a teardown.
- Built-in Git UI and GitHub repo browser let you review diffs and switch branches without leaving the workspace.
- Session, directory, and layout restore means closing the app and reopening it next morning puts every pane back exactly where it was — same
cwd, same agent, same position. - External control API over a local Unix socket lets you script the workspace itself from Alfred, an IDE extension, or a shell script.
Per the project's own description, CodeGrid is built on Tauri and Rust rather than Electron, weighs in at roughly 10 MB, and launches in under a second (source: CodeGrid site summary). It's MIT-licensed, local-first, and collects nothing — relevant if you're skeptical of tooling that phones home while sitting next to your source code.
For deeper background, Terminal Tabs vs a 2D Canvas for AI Coding Work covers the visibility argument, and Best Mac App to Run Multiple AI Coding Agents Locally walks through the multi-agent setup end to end.
Terminal-first agents vs editor-only workflows: which is right for you?
Both modes have a place. The decision comes down to how much of your work is repo automation versus single-file editing, and how many things you want running in parallel.
| Decision criterion | Terminal-first (agent CLI + shell) | Editor-only workflow |
|---|---|---|
| Repo-wide automation | Strong — shell scripting, pipes, worktrees | Limited to editor commands |
| Multi-agent parallelism | High — N terminals, N sessions | Low — typically one active session |
| Git visibility | Native — you're already in the shell | Depends on editor plugin |
| Long-running tasks | Comfortable — backgrounded or in a dedicated pane | Can block the UI |
| Scripted / repeatable runs | Possible (verify your CLI version) | Rare |
| Context switching cost | Low with a session-aware workspace | Low for single project, high for many |
| Learning curve | Steeper — shell fluency required | Gentler |
If you spend your day in tmux, juggling Git worktrees and several repos, a terminal-first agent workflow will feel native — and a session-aware workspace makes it sustainable past three or four parallel sessions. If you mostly edit one project at a time inside a single editor window, the editor workflow is fine on its own.
CodeGrid isn't a replacement for either. It's a workspace for orchestrating the terminal-based sessions you're already running — agent CLIs, plain shells, build watchers, log tails — on a canvas where you can actually see them all.
What should you check when a terminal agent is not found, hangs, or waits for input?
Most agent CLI failures fall into a small set of categories. Walk through them in order before assuming a real bug.
Command not found
which <agent-cli>— empty? It's not onPATH.echo $SHELLand check the matching profile (.zshrc,.bashrc,.config/fish/config.fish).- Open a fresh terminal window after install.
- Check for multiple installs with
which -a <agent-cli>.
Authentication failures
- Re-run the CLI's login command from a fresh terminal.
- Confirm you're not behind a corporate proxy that's blocking the auth callback.
- If you're on a remote machine (
ssh, container, devbox), authenticate there separately — local auth doesn't propagate.
Wrong working directory
pwdbefore starting any session.- If you launched the agent from a parent directory of your repo, exit and restart from inside the repo itself.
Dirty Git state surprises
git statusbefore every session.- Stash or commit anything you don't want the agent to treat as in-scope.
- Use a dedicated branch (
git checkout -b agent/<task>) so a bad run is onegit checkout main && git branch -Daway from gone.
Hung or stuck sessions
Ctrl+Cto interrupt. If the TTY is wedged, close the pane.- Check for an unanswered approval prompt — the agent may be waiting on input you didn't see.
- Confirm the session isn't waiting on a long-running shell command it spawned (look for child processes with
ps).
Missed prompts at scale
This is the silent failure mode. If you can't see all your sessions at once, an agent waiting on input looks identical to one doing work. Use a workspace with per-pane status indicators so waiting sessions visibly flag themselves — and name every pane after its repo and branch so you know which one to focus on.
Ready to stop losing track of agent sessions across a dozen repos? CodeGrid gives every terminal session its own pane with live status on a free-form 2D canvas, with Cmd+B broadcast, built-in Git, and full layout restore — all in a small native macOS app. Download CodeGrid for macOS.
Frequently asked questions
How do I scope a prompt so the agent doesn't touch files I don't want changed?
Include an explicit out-of-scope list in every non-trivial prompt — naming files or modules to leave untouched is the single highest-leverage line you can write. Pair that with a dedicated branch so any overreach is one git restore . away from undone.
How do Git worktrees help when running multiple agent sessions on the same repo?
git worktree add ../myrepo-feature-x feature-x creates a separate on-disk directory for that branch, so each agent session has its own working tree with no risk of edits from one task bleeding into another. You launch a separate agent session from each worktree directory and review diffs independently.
Is it safe to run a terminal agent in CI or non-interactive mode?
Non-interactive mode skips approval prompts and clarifying questions, so validate that a given prompt produces the correct diff interactively first before scripting it. Check your installed version's --help output for the exact flags — CLI surfaces change between releases and assuming a flag exists is how scripts silently no-op.
What's the fastest way to notice when an agent session is blocked waiting for input?
Terminal tabs hide PTY state, so a session waiting on an approval prompt looks identical to one doing work. A workspace with per-pane live status indicators — like CodeGrid's running / waiting / idle / error badges on a 2D canvas — makes blocked sessions visible at a glance without switching to each tab.
Does the agent's working directory affect what code it can see and edit?
Yes — the agent is scoped to the directory you launched it from, so always cd into the repo root (or worktree root) before starting a session. Launching from a parent folder can expose sibling repos to the session, and a dirty working tree means uncommitted changes are visible to the agent as part of the codebase.